This final section of the Main Line as we progress towards Philadelphia is almost completely untouched by re-signaling and functions today in roughly the same fashion as it did back in 1948. As always you can check out the 1992 diagram located here I have also included some photos taken in the fall of 2011 to replace any 2010 photos of inferior quality.
Now I have covered extensively in a previous post, so I have absolutely no intention of repeating myself, however due to the length of the interlocking I was unable to cover much of PAOLI's East End except by setting my camera's zoom to max. The East End begins with a standard 1915 era signal gantry holding the 24R, 26R and 28R signals and the 22R dwarf on the ground under it. In a bit of a historic quirk the 28R and 26R signals have a separate backing plate for the lower position light head. This was how the original PLs on this part of the line were installed back around 1915 with the lamp units set in front of detached black backings.

The 24L and 22L signals for westbound movements are set on a 1930's style of beam gantry and were probably installed when the plant was re-interlocked in the early 30's and the original electro-mechanical frame replaced with a US&S Model 14. The introduction of fully powered signaling allowed the construction of the East End facilities. Also visible are the 25 and 27 switches. The 25 is a 30 mph turnout used by trains on the express track to reach the Paoli Station platform. The slow speed 27 switch is somewhat strange in its placement and as such is barely used (as evidenced by the rust on the rails). It allows access to #2 track in the reverse (non-signaled) direction. What makes this stranger is that #3 track is actually bi-directional so it would be more logical for a facing switch from #2 to #3 in the East End, but this does not exist

However the East End continues on past the 22L/24L gantry, around a bend and finally to the 29 switch which allows trains on track #1 to go express on track #2 as my Amtrak train is shown doing. Note the reverse points, pneumatic point machine and secondary point detector.
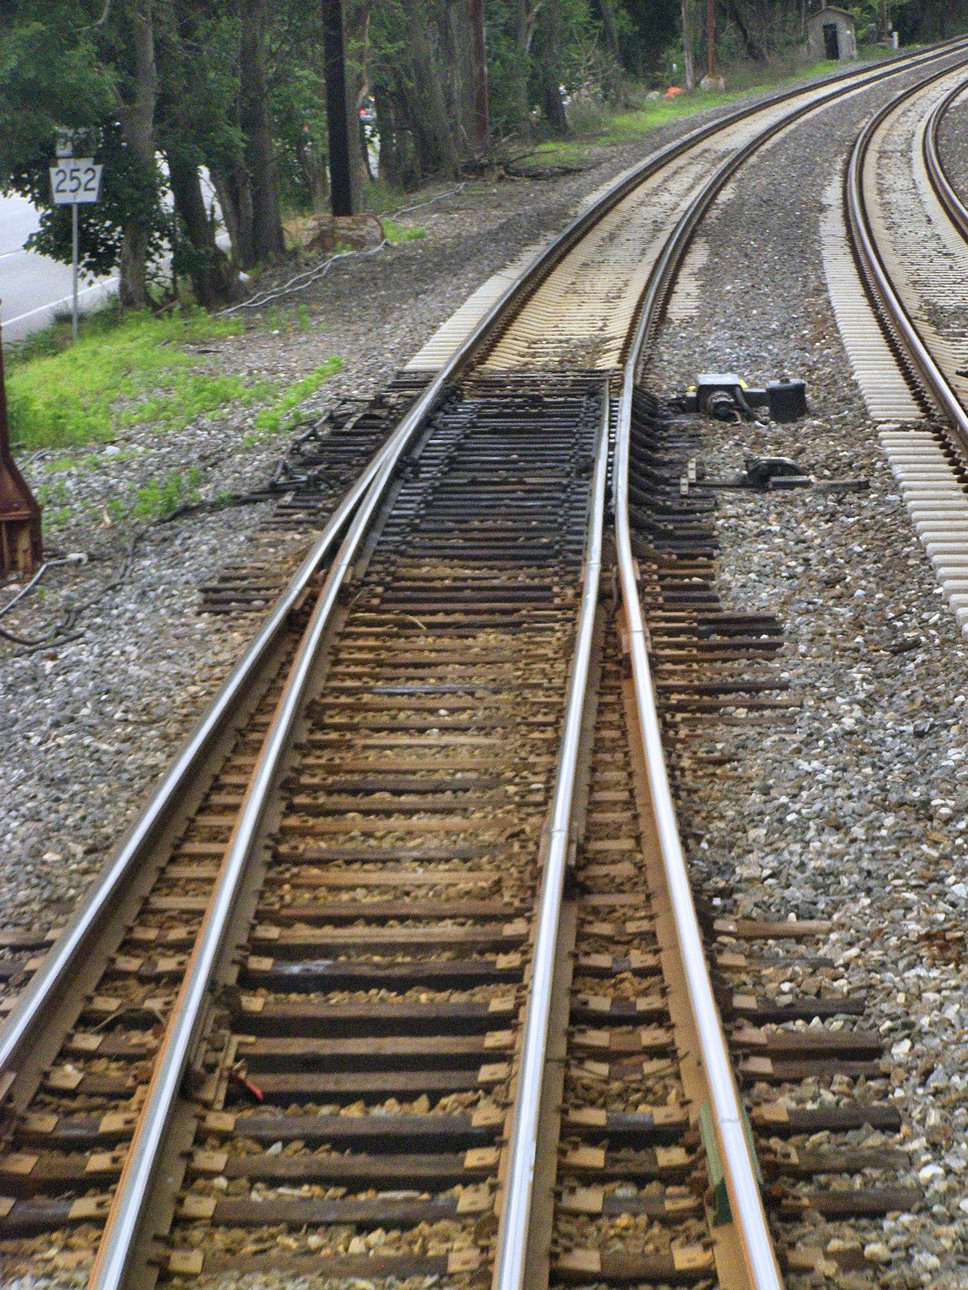
Here we see the entire 29 turnout in all its reverse glory again with the pneumatic point machine and a back drive with attached point detector. In the foreground are the 26L and 28L dwarf signals which are both capable of displaying Slow Clear as PAOLI interlocking is bi-directionaly signaled on all 4 stacks between the east and wet ends.

Wider view showing the displacement between the 29 and 25/27 switches. This was to accommodate very long, long distance passenger trains platforming at Paoli that used to run way back in the day.

So just beyond the 29 switch we see an out of use signal gantry at about milepost 19. I mentioned that back in the day commuter traffic on this line was some of the most intense in the country. Both the steam hauled and later electrified trains weren't exactly sprightly by today's standards with speeds hovering between 30 and 50mph. As a result very close (about .5 mile) signaling was employed to minimize headways. Later block lengths were increased to 2 miles and speeds raised to 70 passenger, 50 freight.

About .6 miles later we find another out of use signal gantry.

Finally about a mile east of that we encounter out first real automatic signal at MP 17.9. This is the distant to PAOLI with lower | heads for the Approach Medium aspect. On #3 track this is used for a the diverging route over the 25 switch. On #1 track there is no longer a signaled diverging route since 2 and 3 tracks were removed west of PAOLI, but it would still be employed due to the short signal distance between the east and west end home signals. Since the time we passed by PAOLI a signal has been displayed on the 22L signal and thus auto 179 is displaying Clear on track 4.
At milepost 17 we have another disused signal gantry, but more interestingly we have what appears to be a cab signal code change point. I don't know exactly why there is a track circuit joint here, but I suspect it is one of the few instances where Amtrak uses the signaling system for track speed limit control. In this case the 50mph Berwyn Curve may come with an Approach Medium (45mph) cab signal change.

The 163 auto is actually mounted on an old single land road bridge which has survived due to its dual function. Remember as track #3 is bi-directional there are 3 eastbound signals and 2 westbound.

Another out of service gantry at MP 15.4 adjacent to the Stafford train station. The station building dates from the 1876 centennial exposition and was recently rehabilitated after a fire.

Here we see the 149 auto now displaying a Stop and Proceed on track #4 after the passage of a westbound local train.

The 133 auto is showing an above average level of rust as the track #4 signal is now at Approach due to the local train some 3-4 miles distant.
Next up is the 119 auto and distant signal to BRYN MAWR interlocking. The signals are fairly basic in the westbound direction while the eastbound signals all have lower |'s and Limited Speed triangles, one of the few instances remaining.

The disused gantry at MP 11.1 still marks the spot of the cab signal code change point in advance of BRYN MAWR interlocking. If signals at BRYN MAWR are displaying Stop, cab signals will drop from Approach to Restricting at this point.

Eastbound home signals for BRYN MAWR interlocking. The signals are mast mounted on top of the gantry to clear the bridge over the tracks in the foreground.

Due to the fire in the tower BRYN MAWR was somewhat re-signaled in 1994 which included dual control electric point machines.

The 1896 built BRYN MAWR tower stands to this day despite the relay room fire. It shares a design with PAOLI.


Because the station is within interlocking limits it is impossible to install a separation fence and so the station is popular with railfans looking for unobstructed views. There is talk about re-locating this interlocking about 2 miles down the track to the area of the 119 auto.

The dual control point machines on the 34 switch were replaced with electric only switches due to a failure of some kind. Amtrak typically does not used dual control points on its busy main lines. To the left is the Bryn Mawr switching substation that provides breakers for the catenary sections. It no longer steps down transmission current since the 1915 era 44Kv feeders were removed in the 1960s.

The westbound home signal is in standard PRR configuration with a pair of high PLs on a gantry and a pair of dwarfs on the ground. After the rebuild the home signals could display the flashing Limited Clear signal so the triangle plates were no longer needed. Also note the lack of an Approach / on the upper track #4 head. Because of the very short block length between here and that bracket signal at the end of the pocket track trains will get a Slow Approach (--- over / ) instead of an Approach.

Out of service gantry at MP 9.5 The county government paid for all of the 1915 catenary poles to be re-painted a pleasing copper oxide color sometime in the 1990s.

Another disused gantry at MP 9.2. This is also the CSS cut for BRYN MAWR interlocking.

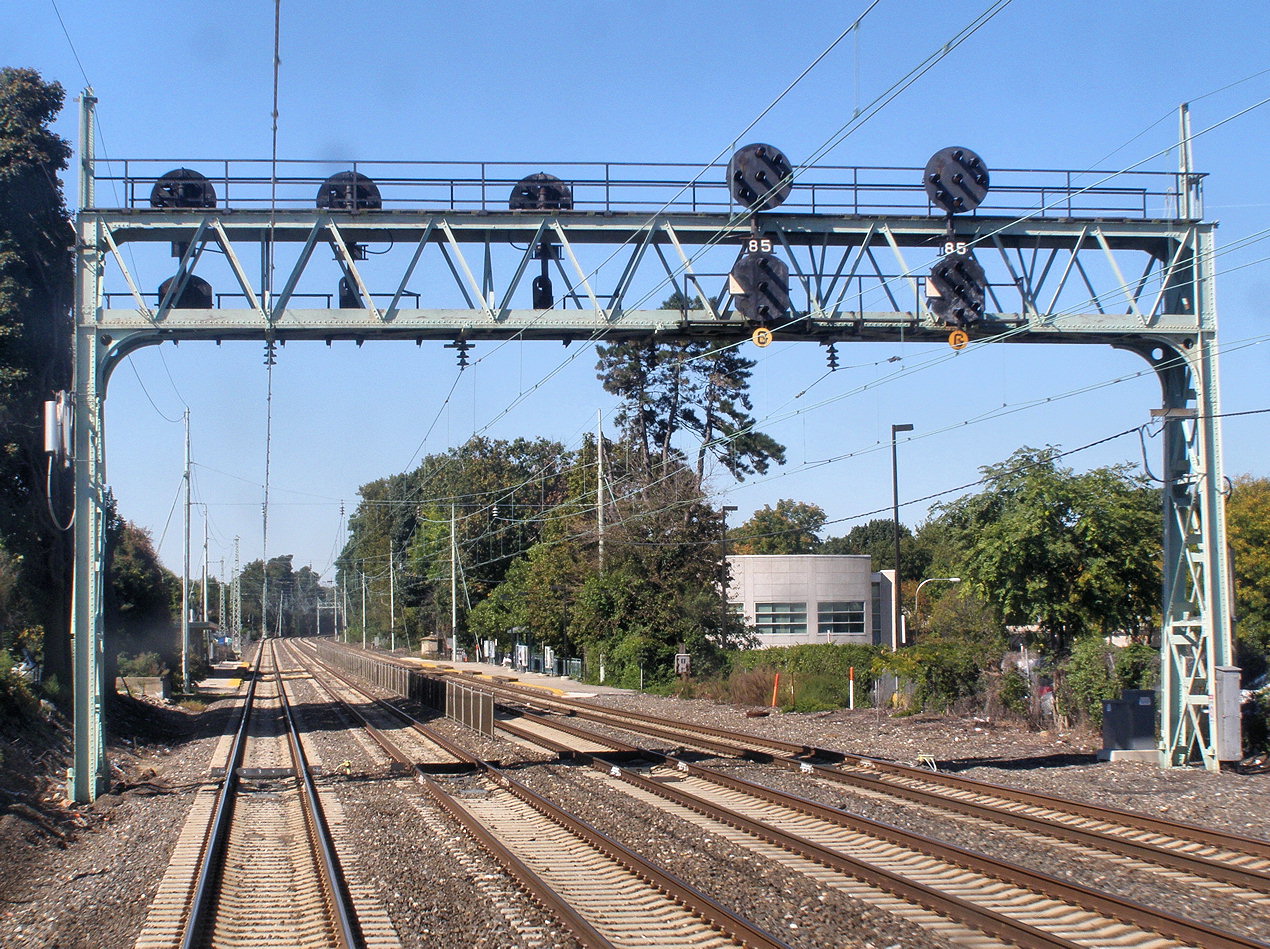
The 85 auto at Ardmore is up next and this well painted gem is sporting full lower heads, limited speed triangles and (G) plates. The track #4 signal can also display Restricting (--- over \)instead of Stop and Proceed for some reason. It would have made more sense to display Approach Slow (/ over /) to go along with the Slow Approach at BRWN MAWR.
Zoom view of the same showing the full brilliance of the PRR Amber PL signals.
Disused gantry at MP 7.6

69 auto is the eastbound distant to OVERBROOK interlocking, but westbound there are only more (G) boards.

One more disused gantry at MP 6.2. Also the code change point for OVERBROOK.

It is here we reach OVERBROOK interlocking, a plant which I plan to write up in much greater detail in the future. So today I will provide a more basic overview. OVERBROOK is a standard 4-track crossover that contains a passenger station with signaled pocket tracks like BRYN MAWR on both 1 and 4 tracks. This is the eastbound gantry showing high signals on tracks 1 through 3 and an westbound exit signal, 4R, on track 3 that I suspect has something to do with the bi-directional operation thereof.

Here we see the 19, 13 and 11 switches, some used more than others. We also see the 18R dwarf signal which is the reverse direction exit signal from the track 1 pocket track.

At the end of the track #4 platform we see the westbound mast pocket exit signal which, unlike BRYN MAWR, is equipped with a full Restricting \

Overbrook station with the 17 switch...also infrequently used. Overbrook is built on a curve, which apparently is not very much liked by railroads, and the points have detected back drives as well.

The 1927 built OVERBROOK tower with 16L pocket track exit signal at the end of the platform. Also visible are the 9 and 15 switches. Usually express trains crossover to track #1 at this point, but for some reason my train was making a special trip straight down track #2. For an interior photo of OVERBROOK's Model 14 machine see my user avatar.

Westbound home gantry at OVERBROOK. Tracks 3 and 4 lack the Approach / due to the very short blocks, just as in BRYN MAWR, Slow Approach being used instead. Track #2 has a high signal with no straight route as track 2 ABS 251 East west of the interlocking.

Adjacent to the main section of OVERBROOK is the Woodbine section which is considered part of OVERBROOK, but worked via direct wire control from a CTC machine inside the tower. This used to be the west end of the Belmont freight yard, but today all that remains is the 019 switch where the #3 track terminated into #2. The Woodbine section of OVERBROOK is only in service on tracks 2 and 3. The signal for track #4 is for the 1994 installed WOODBINE interlocking.

The 018L signal on track #2 into the Woodbine section of OVERBROOK. The extra 0 in 018 is because Overbrook's Model 14 machine has a lever 18 and the 0 is needed to avoid confusion. WOODBINE interlocking is on the right. It is remote from ZOO tower.

If you are confused I will try to clear things up. On the right is the Amber PL 018L signal for OVERBROOK interlocking (on Overbrook's CTC panel) and on the right is the 4E colourized position light for WOODBINE interlocking (remote from a panel in ZOO).

The great Valley Flyover used to carry Main track #4 over the Belmont Yards. In the mid 1990s the condition of the bridge became such a problem that main track 4 was relocated to where the freight yards used to sit and the flyover reduced to hosting the few-times-a-day Cynwyd Line trains. The inbound Cyncyd Line track ducks under the main tracks and joins the main over on track 1 at the old 52nd St Station platform adjacent to the 64RA and 64RB signals.

The sole surviving 63 switch at VALLEY used to be pneumatically operated until the early 2000's when it was converted to electric operation. The compressor house and air pipe do still remain. Despite track #1 being equipped for bi-directional operation via traffic levers at OVERBROOK, the reverse direction 74L signal is still a dwarf.


60R signal at VALLEY showing the Valley Flyover and ramp.

Rear of the 2W and 4W signals of STILES interlocking (R-ZOO) that was installed as part of the relocation of track #4. Note the lack of / on the 2W due to short signal distances with ZOOs home signal.

The 45mph turnout at STYLES. This is normally set reverse and left that way for the normal flow of traffic to 4 track. 2 track is for overflow and special purpose use only.

2E and 4E signals at STYLES. STLIES uses colourized position lights after Amtrak gave up installing Amber lamps after it put in FRAZER. Note the 4W signal doesn't even have any full speed routes as it is simply a yard lead.

You can see the short block distance between STILES and ZOO as we enter ZOO on #2 track past the 146L signal.

Track #1 and former track #4 enter ZOO interlocking via the 142L and 134L signals respectively. To the right is the 143 switch, normally set reverse for the standard traffic flow.

The 143 and 141 switches in what is known as the JO section of ZOO. This used to be operated by JO tower until everything was consolidated into ZOOs 230 lever Model 14 power frame in the early 1930s.

You can see how the old main track #4 had a straight shot out of the Pittsburgh Subway track to the flyover through the JO section of ZOO in this angle. The original routing was to support express passenger trains not stopping at 30th St.

My train stays straight on #2 track as it crosses the 129 switch.

Seeing the westbound signal gantry to the JO section of ZOO I wanted to mention an interesting little bit of trivia. The premier PRR NY-Chicago trains including the Broadway Limited, did not make a stop in downtown Philadelphia due to the need for a reverse move. Instead they took what is called the New York-Pittsburgh Subway and bypassed the Philadelphia terminal area. In order to shave precious minutes off the travel time, the PRR completely engineered the JO section of ZOO to give priority to such routings. Therefore trains emerging from the Subway would get a straight Clear signal on the 134R signal and head right onto the Valley Flyover ramp. Trains on track #4 from Philadelphia would have to make a 30mph diverging move. In this photo note the original style PRR PL lower heads with the small form factor backing. The / and \ rows did not have backings as it was believed that Slow speed movements would have ample time to see the signal from close up.

ZOO was so large and sprawling that one could actually find automatic signals within interlocking limits!!! Due to the ways interlockings are increasingly atomized such a practice would never be seen today. Here is the #27 automatic displaying an Approach Medium for the Medium Clear that was displayed at JO as soon as my train cleared track #2. The Pittsburgh Subway can be seen to the left.

As you can see the 40th street bridge is looking a bit worse for wear and not long after it was demoloshed with the 27 auto being relocated to a new gantry with a brand new colourized position light.


The junction is a standard two track flat diverge. Here the 81 switch as part of that.

Freight in PRR days traveled in the center tracks and to bypass the passenger station these center freight tracks curved in front of ZOO tower as Berry tracks 2 and 3 en-route to the elevated bypass line. Today freight trains no longer touch Amtrak here instead using an old connecting track to the former Reading RR visible here on the right with colour light automatic signal 2W. A couple years ago Berry track #2 was removed just past where this photo was taken leaving #3 as a single track alternate connection to the line to New York if the regular parts of the flying junction complex are unavailable. In the rear is the massive Zoo substation with 6 25Hz 138Kv to 12Kv transformers and 3 banks of catenary section breakers. In the foreground on Berry 3 is the 108R signal and 109sw which provide access to an MoW yard.

The 80R signal in the foreground is for trains on the 36th St connector to join the main line. The 98L signal in the rear is for #2 track as it enters the junction with the K-Ladder.

Here we see the 95 switch which used to be part of the K-Ladder. This was a series of 4 doubleslip switches that provided a flat connection across all the myriad lines in ZOO. When the freight line was still in its PRR configuration up through the early 90s the 95 switch was the last slip switch in the K ladder where the ladder crossed #3 Berry. When the freight connection was removed the freight line was re-routed for a straight path down the Reading connection and the K ladder was chopped turning the 95 switch into a simple turnout.

The 91 switch is another former double slip s #2 track continued on to intersect with the elevated freight bypass as #2 was used mostly by freight trains.

Two double slip switches remain on what used to be the K Ladder as it crosses tracks 1 and 4 on the 36th St connector. Here is the crossing over track #4 with the levers 71/75 double slip.

The lever 69/71 double slip is set reverse to route my train down the 36th St connector to 30th St station.

Zoom view of the K ladder and the 36th connector Jct. Signald 76R and 86R are displaying Clear for the next SEPTA local train westbound.Unfortunately the K-ladder is currently being replaced with a set of non-double slip turnouts serving the same routing. For now control will still reside with ZOO.
Since last summer the old K section of ZOO was split off to be maintained and controlled by SEPTA. Here we see the seam between the two new interlockings with ZOOs 54R dwarf on the K ladder and the 10E signal controlled by SEPTA. Fortunately SEPTA chose to install brand new LED amber position lights.

ZOOs hone signals on the Connector, 68R and 70R.

Old signal gantry on the elevated freight line that used to hold the 90L and 98R signals.

One more signal for ZOO for reverse direction moves on #1 Connector, the 60R dwarf. Meanwhile we see the rears of the home signals for PENN interlocking the 106L and 108L with the 109 switch. The 106L is a pedestal type signals used in close clearance areas.

The PENN 109 switch.

New signal hut for PENN with the 109 and 105 switches. Even after PENN tower was closed its original relay interlocking was retained, with control being transferred to CTEC desk 5 in Amtrak's dispatch office on the 8th floor of 30th St station. For a time the unit lever machine on the 4th floor was retained as backup, but it was removed in 1999. Over the last few years Amtrak has re-signaled PENN to use solid state hardware, but the old style numbering was retained.

104R and 106R dwarf signals. All dwarfs in this area can display a Clear indication as all tracks are bi-directional under traffic lever control.

Remember that elevated freight bypass? Well now we're passing under it.

In a recent about face Amtrak began to replace the pneumatic point machines in PENN interlocking with electric machines as points came up for renewal. Fortunately some points had been renewed with the air machines retained so the interlocking will stay a mixed air/electric plant for at least a little while longer. Her we se the air 95 switch and electric 101 switch.

The 95 switch is protected by the 98L signal. It appears that the signals now use the W/E suffix, but I'll just stick with L/R.

Air 95 turnout next to the now electric 97/99 doubleslip.

Electric 93/87 and 97/99 double slips with the air 83 switch. Ouch, this is making me dizzy. 84L pedestal signal on the right.

Recently re-built 87/93 doubleslip switch. One reason Amtrak may have been hesitant to use electrics at first is that the movable point frogs require two electric machines, but only a single air machine which can be tweaked to pull/push a pair of MPFs.

Here taste/see the difference with the 87/85 and 83/81 doubleslip switches. Heck I wonder if there is even room for the 4th M3 on the 81/83 doubleslip.

Electric 85 switch with the air 81/79 double slip. Rear of the 70L ped close on the left.

The 70L and 68L pedestal signals each protect the 69 and 67 electric switches.

In our final pic of this series we see the twin 70R pedestal signals with an outbound New Jersey Transit Atlantic City Line train departing in the background.

Well I hope you all had fun as it certainly has been a rather long trip. I am in the process of planning a similar series on either the B&O or C&O main lines, but both might have to wait a bit until some additional material comes in. If you have your own ideas of what you might like to see covered let me know. Other options include the RF&P main, Southern Main and CSX A-Line.
No comments:
Post a Comment