Search This Blog

Showing posts with label MILW. Show all posts

Wednesday, December 24, 2014

PHOTOS: Amtrak LAKE ST Tower

It's been a while, but it is finally time to conclude my METRA Tower series by looking at a tower that wasn't METRA's at all, but played a large role in METRA operations.  This would be Amtrak's LAKE ST tower, situated (until recently) at the north end of Chicago's Union Station.  The tower was built by the same PRR/MILW/CBQ consortium that built the entire Chicago Union Station complex in the mid-1920's.  Despite its prominence I have not yet been able to locate any period interlocking diagrams or other information that could better inform my talk, but since when has that stopped me before ;-)


Built during the roaring 20's, LAKE ST exhibited all the opulence of the era with a tile roof, copper gutters and all brick construction.  During the Amtrak era is was actually upgraded with modern picture windows and ample exterior lighting.  LAKE ST was closed in 2005 after 80 years of service and then demolished in 2013 due to an overbuild project to cover the tracks with either condos or a park. Until then it was a fixture of the north side railfan scene, viewable from the adjacent Lake Street bridge and easy to work into all sorts of photo angles. This may seem like the typical story of a classic big city tower, but LAKE ST was something special and one tip off is the windows.

Like many Chicago area towers, LAKE ST was equipped with an emergency exit.
The south side of Chicago Union Station is far more complex and sees far more traffic.  With road bridges providing an unobstructed view of the action it is what people think of when they think about long distance passenger rail in Chicago.  That part of Chicago Union Station was controlled by HARRISON ST tower, an elevated affair that was eventually surrounded by the new post office building in the mid-1990s.  At the time Amtrak also embarked on a large scale re-signaling project on the south side replacing the old Model 14 machine in Harrison Street with modern relay logic and the PRR position light signals with B&O style CPL dwarfs and high color lights.

What main people failed to realize was that the north side interlocking controlled by LAKE ST was left completely untouched and moreover, control of the south side plant was moved to a large NX panel in LAKE ST tower.  Thus LAKE ST wasn't just a tower, but was the control facility for the entire Chicago Union Station complex. Thus, nice new lighting and big picture windows.


 In 2005 time finally caught up with LAKE ST as a $45 million, 2-year project to re-signal the north end finally came to fruition.  This saw the replacement of the PRR PL dwarfs with LED searchlights, the implementation of a new CANAL ST interlocking to replace what had been a number of hand throw crossovers north of LAKE ST interlocking proper and the consolidation of all Chicago signaling control into the CUS office complex.  This included the closure of Amtrak's 21ST interlocking at the southern gateway to the CUS complex as well.  The interior photos I have of LAKE ST were taken just before and then a few years after its closure.


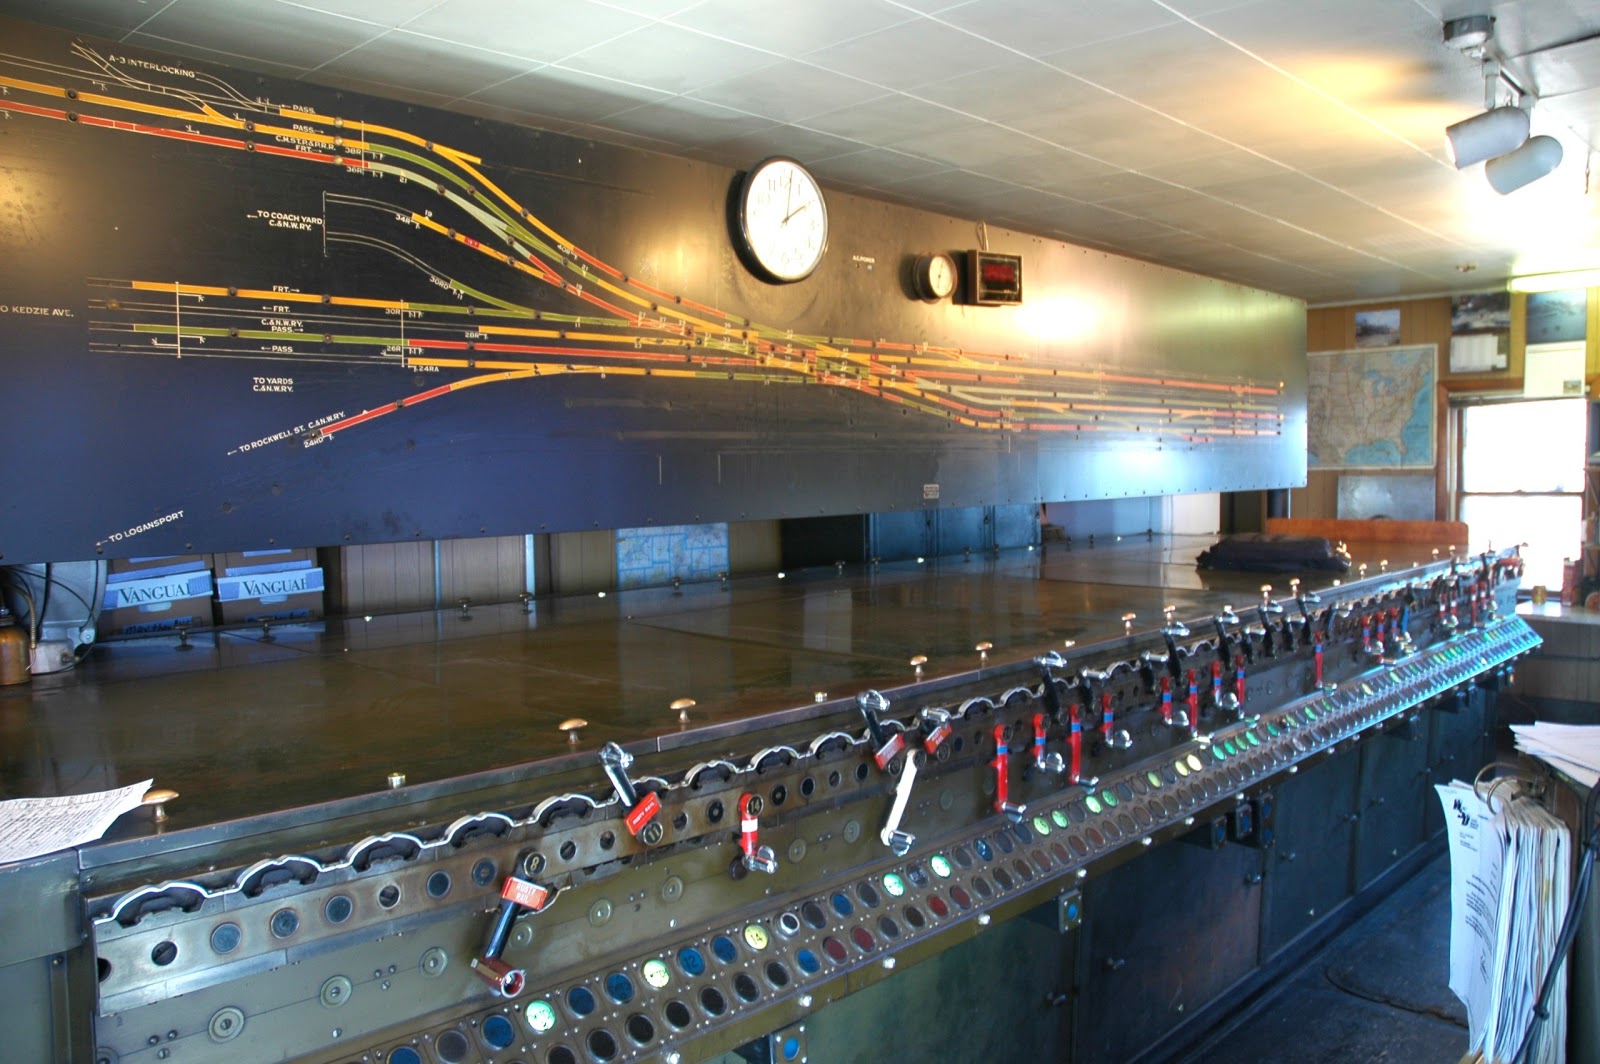
Here we see a post closure photo the 95-lever US&S Model 14 interlocking machine originally installed in 1925.  The large number of white painted spare" levers is due to the rolling closure where successive parts of the interlocking plans were cut into the new vital logic.  At the time of its closure the LAKE ST Model 14 was down to 9 signal levers, 4 switch levers and one traffic lever.


The model board shows the layout as it originally was with 11 station tracks that fanned out from a three track main line.  9 of the tracks are stub end with 2 additional through station tracks and 1 bypass track.  Station tracks are given odd numbers as even numbered tracks are on the south side of the station.  The model board is 4-colored in accordance with Milwaukee Road practice and uses green lamps for track occupancy.  Displayed signals are not shown on the model board.  Alterations have been made with a combination of black tape and hand painted lines.  On the through tracks a number of signals that are controlled from the NX panel are indicated with the N/S suffix opposed to L/R.  A quick count indicates 7 doubleslip switches, 11 single turnouts and 5 crossovers.


 In this opposite view of the model board we can see the entrance to the interlocking at the grade crossing with Canal St.  Most of LAKE ST interlocking is located underground a block or two north of the tower itself.  The tower only had direct sight of a few hand throw crossovers near Canal St and the outer crossovers between Lake St and Randolph St.  One of the reasons for the rolling cutover was because the interlocking was not only resignaled, but also reconfigured.  Compare the model board above with a facing point ladder track, stub end track 5 and a non-circuited track passing close to the tower to the current layout below.


Here we see a parallel trailing point ladders, one of which employs a doubleslip, the other a scissors crossover between the two center tracks.  The non-circuited track has been removed leaving the single station bypass track.For a more complete view of the current interlocking layout please refer to this computerized model board of the Chicago Union Station area. 


Back inside the tower we see an odd blank patch on the interlocking machine where lever spaces 1 through 32  had been removed.  This does not appear to have been part of the re-signaling effort given the age and condition of the metal.  Looking at the model board I suspect there was some spare capacity at the lower end of the machine in addition to some of the northern part of the plant being made redundant through hand operated switches. Without lever positions on the frame I am unsure how the 16L, 18L, 20L, 24R, 26R and 28R holdout signals at Canal street were controlled.

 Closeup view of the levers looking down the frame towards the emergency exit door.  The bay window is to the left of the photo.  Last active lever is 94, but the frame has space for 95.


Another view of the levers this time showing the mix of 1920's and modern track lighting fixtures. 


Moving back in time to 2004 we see the tower towards the end of the re-signaling project.  The Model 14 machine is still in service, but most functions have been transferred to a pair of NX panels sitting over the blank section of the frame. The remaining part of the interlocking still controlled by the Model 14 is covered over on the panels.


Monday, January 14, 2013

PHOTOS: METRA TOWER A-5 (Pacific Junction)

While I have now covered most of the major METRA operated interlocking towers in the Chicago Area in my ongoing web series there are still a few left in the bag and one of these is the partner in crime to the recently covered METRA Tower A-2 at Western Ave. Pacific Junction is a 4-legged junction on the old Milwaukee Road passenger network as it approached Chicago's Union Station. Logically it is composed of the Milwaukee Road main line to Milwaukee running North-South and the main line across Illinois splitting off to the west with a small freight spur heading west to the Chicago River industrial district. In practice the junction looks like a 90 degree crossing with connector tracks cutting each of the corners. Today the Chicago commuter railroad provider METRA owns both the interlocking plant itself and the tracks south to Chicago Union Station. All other lines feeding the interlocking are owned by Canadian Pacific which was previously handled through its SOO Line subsidiary. Today the line to Milwaukee comprises the CP C&M Subdivision while the line to the west is the Elgin Sub and together they host the METRA Milwaukee North and Milwaukee West commuter services.

On the ground Tower A-5 has a very interesting layout with a three track main line running north to west via a sweeping 90 degree curve and another two track main line splitting from the 3 track line to run north. The eastern two-track freight spur used to split from the western route of the 3-track line, crossing the north-south line via a diamond crossing, but the diamond has since been removed leaving access to the freight spur and wye track via the curved connections to the north-south line. Here in a photo from the Railroad Signal Collections site we see the A-5 interlocking plant from the west with the tower visible far in the background. While technically two of the three Elgin line tracks diverge into the C&M line, the weak route signaling used on the line offers each of the two rightmost tracks (tracks 2 and 3) a "Straight" route through the plant. In the photo the track #2 signal is displaying a lunar white Restricting indication due to another train running ahead in the same block. Previously the former Milwaukee Road lines utilized "bottom yellow" Restricting, which is derived from the older practice of having a subsidiary signal for "call-on" indications. This is why the track #3 signal has the gap between the lower and upper heads to differentiate R/Y Diverging Approach and R/*/Y Restricting. Use of Lunar White in place of bottom yellow removes this potential conflict. A 4th siding track also used to join the junction from the right, but this has been removed although its signal on the gantry has only been partly so.


Here we see the rear of the northbound home signal gantry for Tower A-5. A three headed signal is provided for each track as all three are provided with diverging routes. The right of way clearly had provision for 4 tracks, but as the model board no longer shows any indication of a 4th track I cannot comment on the original layout of the tower as I do not have an original diagram. Both home signal on the three-track route are provided with absolute exit signals controlled from tower A-5. The use of exit signals is an easy way to implement bi-directional operation with simple relay based interlockings as it simplifies a lot of the logic by not having to check traffic flow status when setting up a route through the plant.  Also note the 72L signal for track #2 which lacks a middle "diverging" head despite protecting the 63 switch which can send trains either north or west.  This indicates either that both routes are signaled for the same speed and thus do not need to be differentiated or that a diverging move would need to be made under a Restricting indication.


Monday, October 8, 2012

PHOTOS: METRA TOWER A-2 (Western Ave) Part 2 - Inside

So back in Part 1 we explored the history behind TOWER A-2 and the layout of the interlocking plant.  Here in Part 2 we will venture inside the tower to see how it functions as a critical part of the Chicago area commuter rail network.  Just for a quick reference I am going to throw up the link to the original interlocking diagram again so you can open it in a second tab or window for reference.

So we will begin with another quick look outside the tower at the entry stairway which was clearly updated at some point after construction.  The PRR tended to prefer internal stairways for its late model interlocking towers, but in this case Milwaukee practice seems to have prevailed with an external stairway and door.  As is typical the relay room has been provided with its own entryway.  The upper story of the tower has been retrofitted with new siding and new replacement windows, but fortunately seems to have avoided the worst aspects of Tower Window Syndrome with none of them being boarded up.


Here we see the venerable US&S Model 14 electro-pneumatic interlocking machine.  This is an 83 lever frame that contained 69 active levers in its original configuration with 45 for switches, derails and movable point diamonds, 22 for signals and two release levers that I believe set traffic direction over the crossing.  As this tower is following Milwaukee practice the model board is of the more colourful variety with color coded track circuits whereas PRR practice used a white on black scheme with diagram symbols to indicate circuit boundaries.  The other Chicago Union Station towers, LAKE and JACKSON streets, also used this multi-colored style.  Due to the four color theorem US&S only needed pastel versions of red, green, yellow and blue to represent all the circuits without having any one color touch another of the same type.

While the model board has had all of the removed trackage blacked out, those altering it did a good job blacking out what was gone and re-painting what could not be simply blacked out.   Moreover all of the original text labels like C.&N.W. RY and C.M.S.P.&P. RY are still present along with the control city of Logansport on the since removed PRR Panhandle track.  BTW, I believe that the model board is in fact fitted with three clocks, one old analogue, one new analogue and one digital.


Builder's plate on the Model 14 machine.  Constructed in 1938 this is a fairly late model frame, although production would continue up until the 1950's.


Wider view of the Model 14 machine.  You can see that when the tower was renovated it was fitted with a drop ceiling and track lights to illuminate the model board.


Opposite side angle view of the Model 14 power frame.  You can see that the lever 83 position is still occupied to control a switch.  Of the 69 original active levers about 45 are still in service.  Those switches that do not see frequent movements are affixed with Rusty Rail tags which remind the operator that trains working over those switches may not shunt and therefore the operator should verify that the route is clear before making any conflicting actions.  Probably due to a noddle incident there is now a sign on the interlocking machine advising people not to put food or drink on top of it.

As would be expected the levers at the far right of the machine handle the position light signals and crossovers in the east end of the interlocking plant. The 77 turnout is set reverse with a blocking device applied which would imply that track #2 east is out of service at that time.


Here in a closeup of levers 29 through 49 we see the standard US&S setup with switch levers pointed upwards and signal levers pointed downwards.  Unlike PRR practice, the levers here have also been painted in the normal style with switched black, signals red and lock levers blue.  The PRR tended to leave all of its power frame levers painted black.

Saturday, September 8, 2012

PHOTOS: METRA TOWER A-2 (Western Ave) Part 1

METRA Tower A-2, also known as Western Ave, is one of the most epic interlockings in North America.  Unlike many of the well known east coast interlockings like ZOO or UNION or JAY/HALL, Western Ave doesn't have networks of tunnels and flyovers artfully sending trains to their required destinations.  Western Ave does things the Chicago way with brute force using diamonds, diamonds and more diamonds.  Furthermore, the interlocking plans survives with an active tower and many original appliances from its heyday in contrast to many other large Chicago area interlockings which have fallen prey to resignaling and simplification in recent years.

Tower A-2 and the interlocking complex known as Western Ave is located a few miles to the west of downtown Chicago where the present day METRA Milwaukee District crosses the  METRA UP West Line. However back in the day the interlocking actually involves three railroads.  The heart of the interlocking was where the Milwaukee Road's trunk line to the North and West crossed the former Chicago Northwestern Railroad's main line to the west through Iowa.  There is where one four track main line met another four track main line at grade and the only solution was a set of diamonds.  Actually, diamonds would have been simple blessing, sort of an Englewood of the north side, as the lines cross at about 30 degree angle which required a set of 16 double slip switches and movable point diamonds to be constructed.  This is perhaps the largest such application of double slips and movable point diamonds to ever be installed in North America outside of a terminal location. 

Just when you thought it couldn't get any better the Pennsylvania Railroad got involved.  You see, the PRR didn't just have one route into Chicago.  Aside from the familiar route via Fort Wayne, passing through the Quad Draws and 21st St Tower (aka Alton Junction), the PRR operated what was known as the Panhandle Route, named after the West Virginian panhandle through which its main line passed after splitting off the usual main line at Pittsburgh.  The line continued on via Columbus, Richmond and Logansport, entering Chicago through the back door, running parallel to the B&OCT up through 75th St Junction and the Brighton Park crossing until it hit the CNW main line where it made a sharp right hand turn to curve back in toward the loop and the Chicago Union Station complex, rather ironically traveling the final miles to Chicago heading due east.  This right turn is located at Chicago's Western Avenue and is also the point where the PRR Panhandle Route would merge with the Milwaukee Road's Chicago main line.   Due to the PRR's 50% stake in the Chicago Union Station enterprise, this part of the line was equipped with position light signaling, making the junction at Western Ave a real Chimera with PRR, CNW and Milwaukee Road signals.


So let's take a quick look at Western and as you can see in this thankfully clear interlocking diagram, its layout borders on the insane.  It is similar to the interlockings at either ZOO or Janacia in function, a major sorting and junction point where two trunk lines meet on their way downtown, but like I said this one takes the brute force approach instead of something more elegant with ramps and flyovers.  The 83 lever US&S Model 14 interlocking is large, but still modest in size falling well short of at century mark at 83 total levers with 69 active.  Like I mentioned before the real hallmark of this interlocking are the doubleslip switches and movable point diamond (MPD) crossings.  Aside from the 4x4 crossing with its 7 doubleslips and 8 MPD's, as built there were two additional doupleslips for a trailing point ladder track on the CNW trunk and three additional MPD's where the Milwaukee Road track join with the PRR tracks.  All told there are 11 MPD's and 9 doubleslip switches, amounts not normally encountered of outside of terminal interlockings. 

It is also interesting to note how this interlocking was zoned.  As you can see there is the Milwaukee /CNW crossing zone and the Milwaukee/PRR junction zone.  In the PRR Zone the PRR was of course calling the shots and all of the signals were position light.  The CNW tracks of course has CNW type ssearchlight ignals and the last entrance for the Milwaukee Road was equipped with Milwaukee searchlights.  As the interlocking plant was built in 1938, all of the signals were of the most modern type (ie no semaphores) and those original signals remain in service to this day, for the most part.

At this point I wanted to mention that the photos used for the essay come from a series of my own trips to Western Ave (exterriors) and from a source at METRA (interriors).  My own trips were taken in 2007  on an inbound UP West Line train, 2009 on an inbound Milwaukee District train and 2010 on a trip to the Western Ave METRA station.  This first photo of the tower was from the 2007 set.